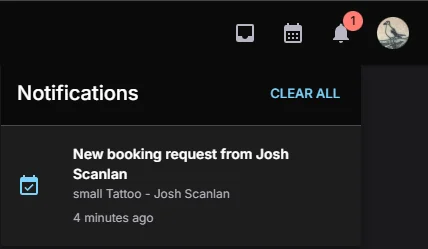
How to Handle Booking Requests and Deposits: A Complete Guide for Tattoo Artists
Managing booking requests efficiently can make the difference between a fully booked schedule and constant gaps in your calendar. Whether you're working independently or out of a studio, establishing a professional booking workflow with clear deposit policies protects your time and reduces frustrating no-shows.
This guide walks you through every step of the booking process, from receiving your first inquiry to converting confirmed requests into paid appointments on your calendar.
Understanding Booking Requests
What Information to Look for in a Request
When a booking request comes through, you need specific information to decide whether it's a good fit. Well-structured requests should include:
- Tattoo details: Style, size, placement, and design description
- Reference images: Photos showing what the client envisions
- Budget range: Their expected price point
- Availability: Preferred dates or time windows
- Client background: First tattoo vs. collector, pain tolerance, existing work in the area
- Special considerations: Medical conditions, allergies, skin sensitivities
The more complete the request, the easier it is to evaluate whether you can take on the project. Incomplete requests aren't necessarily bad clients - they may just need guidance on what information you need.
Red Flags vs. Green Flags
Green flags that indicate a serious client:
- Detailed description with realistic expectations
- Multiple reference images provided
- Flexible on dates but has general timeframe
- Respectful communication
- Acknowledges deposit requirements
- Understands approximate pricing for their request
Red flags to watch for:
- Extremely low budget for complex work
- Demands immediate appointment
- No flexibility on design or placement
- Asks for free custom drawings before booking
- Pushy about pricing negotiations
- Multiple requests for the same design to different artists
Trust your instincts. If something feels off about a request, it's okay to decline professionally.
Reviewing and Responding to Requests
Your Four Options
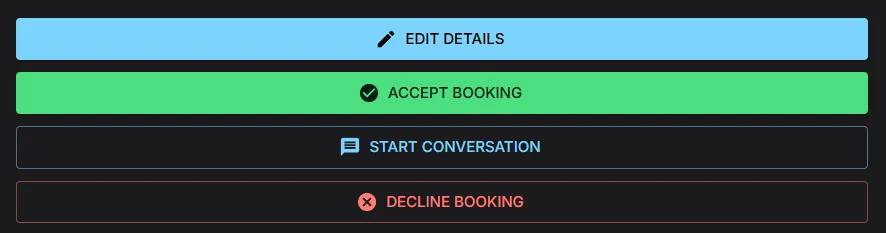
For every booking request, you have three clear choices:
- Edit - Change any details on the request, like the deposit, total, location, or date.
- Accept - You can do the work, the timeline works, and you want to take this client
- Request More Information - You're interested but need clarification or additional details
- Decline - The project isn't a good fit for your style, schedule, or other reasons
Accepting a Request
When you accept a request, respond promptly with:
- Confirmation that you can do the work
- Timeline for custom drawing (if needed)
- Estimated session length
- Your deposit policy and amount
- Next steps for scheduling
Example response:
"Thanks for your request! I'd love to do this piece for you. Based on the size and detail level, I'm estimating 4-5 hours at $150/hour. I require a $200 non-refundable deposit to secure your spot and begin the custom design. Once I receive your deposit, I'll send over design concepts within 2 weeks. We can then schedule your appointment. Sound good?"
Requesting More Information
Don't hesitate to ask follow-up questions before committing. This actually demonstrates professionalism.
Common things to clarify:
- Exact placement and size measurements
- Color vs. black and gray preference
- Design elements that aren't clear from references
- Whether they're open to your artistic interpretation
- Their pain tolerance and session length comfort
- Budget flexibility if their request exceeds their stated range
Keep the tone friendly and educational, not interrogative.
Declining Professionally
You can't take every request, and that's okay. Decline respectfully with a brief explanation:
- "This style isn't my specialty, but I'd recommend checking out [Artist Name] who does amazing work in this area."
- "My schedule is fully booked for the next 6 months. I'd hate to make you wait that long."
- "Based on the size and detail you're describing, this would require 15+ hours, which is outside your stated budget. You might need to simplify the design or increase your budget."
A professional decline maintains your reputation and sometimes leads to future bookings when circumstances change.
Communicating Through Messaging
Once you've responded to the initial request, ongoing communication happens through your booking platform's messaging system. This keeps everything organized and documented in one place.
Best Practices for Client Messages
Response time matters: Aim to respond within 24 hours. Clients often reach out to multiple artists, and quick responses increase your booking rate.
Be clear and specific: Avoid vague answers about pricing, timing, or policies. Clarity prevents misunderstandings.
Set boundaries: Don't feel pressured to respond instantly to every message, especially outside business hours. Set client expectations about your response time.
Document everything: Keep all communication in the messaging system rather than moving to text or social media. This protects both you and the client if disputes arise.
Stay professional: Even if a client is difficult, maintain professional communication. Your messages reflect your business.
What to Discuss Before Sending a Deposit Request
Before asking for money, make sure you've covered:
- Final design direction and any modifications
- Confirmed size and placement
- Agreed-upon pricing
- Estimated session length
- Your deposit amount and refund policy
- Rescheduling and cancellation policies
- Aftercare requirements they need to know
Getting alignment on these points before requesting payment prevents disputes and ensures both parties have clear expectations.
Setting Up Payment Methods
To collect deposits and payments professionally, you need to set up your payment processing. Modern booking platforms offer multiple options.
Stripe Connect: Integrated Payment Processing
Stripe Connect provides the most seamless experience for both you and your clients:
Benefits:
- Clients pay with credit/debit cards directly through the platform
- Funds deposit to your bank account within 2 business days
- No awkward payment conversations
- Automatic receipts and documentation
- Professional appearance
- Built-in fraud protection
How to set up:
- Navigate to your payment settings in your artist account
- Click "Connect with Stripe"
- Complete identity verification (required for compliance)
- Link your bank account
- Accept Stripe's terms of service
The setup takes about 10 minutes. Stripe will verify your identity and bank information, then you're ready to accept payments.
Platform fees:
- Artist Pro subscribers: 1.1% platform fee
- Free tier artists: 4.1% platform fee
- Plus standard Stripe processing fees (2.9% + $0.30)
- Clients pay all fees on top — you always receive the full amount you request
Example: You request a $200 deposit on Artist Pro. The client pays $208.30 ($200 + fees). You receive the full $200.
Sending Payment and Deposit Requests
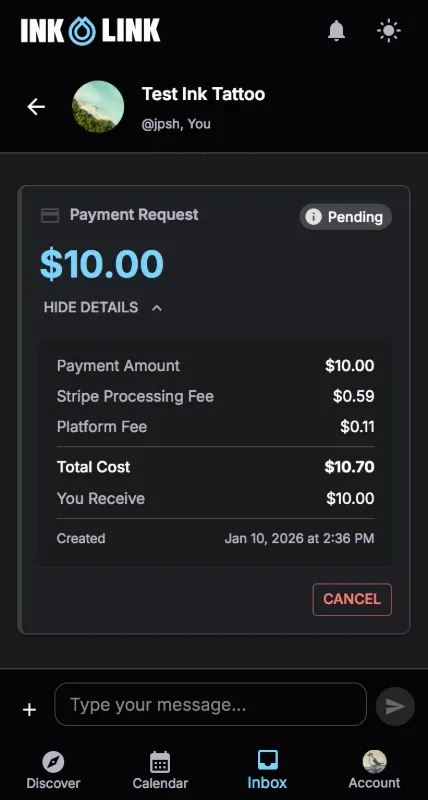
Once you've agreed on the work and discussed pricing, it's time to request the deposit.
How Payment Requests Work
Modern booking platforms let you send payment requests directly through the messaging system:
- Open your conversation with the client
- Click "Request Payment" or similar option
- Enter the deposit amount
- Add a description (e.g., "Deposit for 6-hour sleeve session")
- Select which payment methods to offer
- Send the request
The client receives a notification and can pay immediately through the platform. You'll be notified when payment is received.
Deposit Policy Best Practices
Be crystal clear about your deposit terms:
Non-refundable deposits are standard because:
- You've already invested time in the consultation and design
- You've held a spot that could have gone to another client
- They incentivize clients to show up
When to refund deposits:
- True emergencies (serious illness, death in family) - use your judgment
- If YOU need to cancel or reschedule
- If you can't deliver what was agreed upon
Rescheduling policies:
- First reschedule: Deposit transfers to new date (common practice)
- Multiple reschedules: May require additional deposit
- Must reschedule within a reasonable timeframe (e.g., within 6 months)
- Last-minute cancellations (less than 48 hours): Deposit forfeited
State these policies clearly before accepting payment so clients understand and agree upfront.
Reducing No-Shows and Cancellations
Even with deposits, no-shows can happen. These strategies minimize them:
Reminder Systems
An automated reminder system built into Ink Link handles reminding both you and your client of their appointment the day before.
Clear Cancellation Policies
Make your policies visible and unavoidable:
- State them when accepting the booking request
- Include them in your payment request message
- Display them on your booking page or profile
- Send them again with appointment confirmation
Clients can't claim they didn't know if you've documented it multiple times.
The Right Deposit Amount
If you're experiencing frequent no-shows:
- Your deposits may be too low
- Increase to 50% of estimated total cost
- Or require 100% payment upfront for appointments under 2 hours
Higher deposits hurt more to forfeit, increasing commitment.
Building Relationships
Your best clients are repeat clients:
- Provide exceptional service and results
- Follow up after appointments
- Send healing check-ins
- Remember details about them
- Make the experience enjoyable
Clients who value you and your work rarely flake.
Handling Refunds and Disputes
Occasionally you'll face situations requiring refunds or resolving payment disputes.
When to Issue Refunds
Automatic refund situations:
- You need to cancel the appointment
- You can't complete the work as agreed
- Equipment failure or studio issues prevent the session
- You're sick or have an emergency
Judgment call situations:
- Client has a legitimate emergency (medical, family)
- Miscommunication about design or pricing
- Client is genuinely dissatisfied before work begins
Never refund situations:
- Client simply changed their mind
- Client no-showed without explanation
- Client cancelled last-minute for convenience
- Client was disrespectful or violated policies
Processing Refunds
If you use Stripe Connect:
- Go to your payment dashboard
- Find the transaction
- Click "Issue Refund"
- Select full or partial amount
- Confirm the refund
Funds typically return to the client's account within 5-10 business days.
Dispute Resolution
If a client disputes a charge:
Stripe disputes:
- Stripe notifies you automatically
- You have 7 days to respond
- Provide documentation (messages, policies, proof of agreement)
- Stripe reviews and makes a determination
To protect yourself:
- Keep all communication in the platform
- Screenshot any external conversations
- Document your policies clearly
- Save design approvals and confirmations
The more documentation you have, the better your case.
Prevention is key:
- Overcommunicate policies upfront
- Get explicit agreement before accepting payment
- Address concerns immediately, don't ignore them
- Be reasonable when clients have legitimate issues
Most disputes come from misunderstandings, not malicious clients.
Get started now: Create your free Ink Link profile and configure your payment settings in under 10 minutes. Your next booking is waiting.